
The class you are using determines which Specialization tree and nodes you can build.
Build system · Character Lv40
Class Specialization: build a route for the fight
Every class has its own Specialization tree. The rules are shared, but the node names, effects and best combinations depend on the class and the activity.


How Specialization works
Build points, then spend them on one class route.
Specialization unlocks at Character Lv40. Shards become Specialization Points, and those points activate or upgrade nodes in the tree for the class you are using. Every class has different nodes, but the crafting time, point gates, 20-point cap and free reset work the same way.
Collect Specialization Shards from the confirmed sources shown below.
Combine shards into a Specialization Point. The first point is instant; every later point takes 12 hours.
Spend toward the mechanic you want. Some nodes stay locked until enough total points have already been invested.
The reset returns every point, so you can rebuild for another activity without losing points.
Where the game says shards come fromDaily Specialization bountyNew big-map level bracketsMysterious-obelisk challenges
Read any class tree
Sort each node by the job it does
Do not judge a node in isolation. Check what it changes, what triggers it and whether that trigger actually happens in your fight.
The central effect that defines how the class specialization plays.
Nodes that increase the value of the hit, stack or final charge.
Shorter charge time, faster cycles or better uptime.
Lock-on, range or area effects that make the damage connect.
Burns, chains, echoes or bonus hits that fire from the main mechanic.
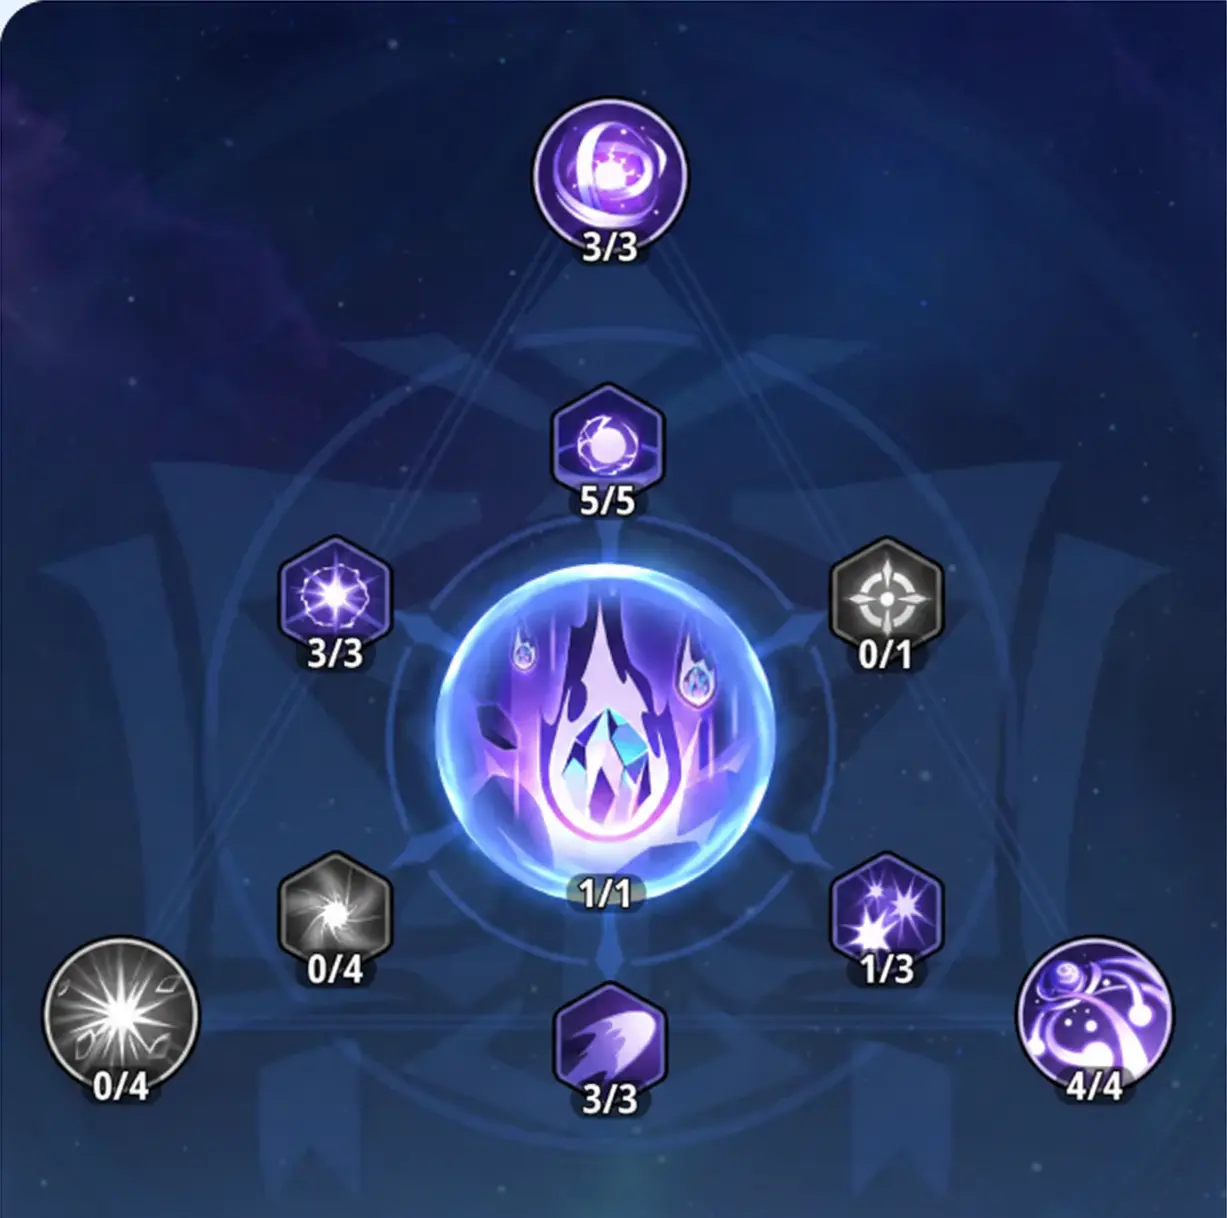
Mage example · not a rule for other classes
Concentrated Exploding Star
This tree turns standing time into stronger Arcane Missiles. The current capture spends all 20 points on faster strengthening, stronger late stacks, repeated-launch scaling, an extra-explosion chance and the full-charge burn.
Points shown20 / 20 spentCurrent finisherBlazing Missile · 4/4Open alternativesTargeting, auto-launch or short-charge route
Names and values below were read from the supplied in-game tooltips.
Mage node guide
What each icon does
The point badge shows the state in the supplied capture. A 0/x node is an available alternative, not part of that captured route.
 Core
CoreConcentrated Exploding Star
1/1Stand still for 2 seconds to form an Arcane Missile. Each further second adds a strengthening stack, up to 5. Moving launches it; at full strength it auto-launches after 8 seconds. Base damage is 200%, plus 300% per strengthening.
 Scaling
Missile Enhancement
5/5Each strengthening adds another 40% / 80% / 120% / 160% / 200% to the missile's damage rate.
 Tempo
TempoRapid Energy Recharge
3/3Shortens missile strengthening time by 10% / 20% / 30%.
 Scaling
Strength Through Reserve
3/3Boosts the 4th strengthening by 100% / 200% / 300% and the 5th by 200% / 400% / 600%.
 Loop
LoopArcane Echo
3/3Launching a missile grants an Echo for 16 seconds. It increases the next missile's explosion damage by 15% / 25% / 40% and stacks up to 3 times.
 Extra hit
Chain Explosion
1/3When the missile explodes, it has a 10% / 20% / 30% chance to trigger one additional explosion.
 Full-charge payoff
Blazing Missile
4/4A fully strengthened missile leaves a 5-second burning area that deals 60% / 120% / 200% / 300% damage each second.
 Targeting
Precision Explosion
0/1The launched missile automatically locks onto attack targets.
 Tempo
TempoEnergy Accumulation Timing
0/4Reduces the stationary auto-launch timer by 0.5 / 1 / 1.5 / 2 seconds.
 Short-charge payoff
Charged Explosion
0/4After two consecutive launches below 3 strengthening stacks, the next missile's extra-explosion chance rises by 15% / 30% / 50% / 70%.
Combination tips
Match the route to how the fight plays
These are practical starting directions from the Mage tooltip mechanics. They are not fixed presets: reset is free, so confirm them in the same repeatable fight.
Hold position and cash out full stacks
Build around Concentrated Exploding Star, Missile Enhancement and Strength Through Reserve. Arcane Echo rewards the repeated launches; Blazing Missile adds a burn when the target stays inside it.
Full-strength missilesLate-stack damageSustained loop
Reach useful damage sooner
Rapid Energy Recharge shortens the setup. Precision Explosion helps missiles find moving targets, while Charged Explosion is written for repeated launches below 3 stacks.
Faster chargeLock-onShort launches
Add effects after the missile lands
Chain Explosion adds another explosion chance. Blazing Missile leaves a 5-second damage area after a full charge, so use it when packs stay grouped long enough.
Extra explosionBurning areaGrouped enemies
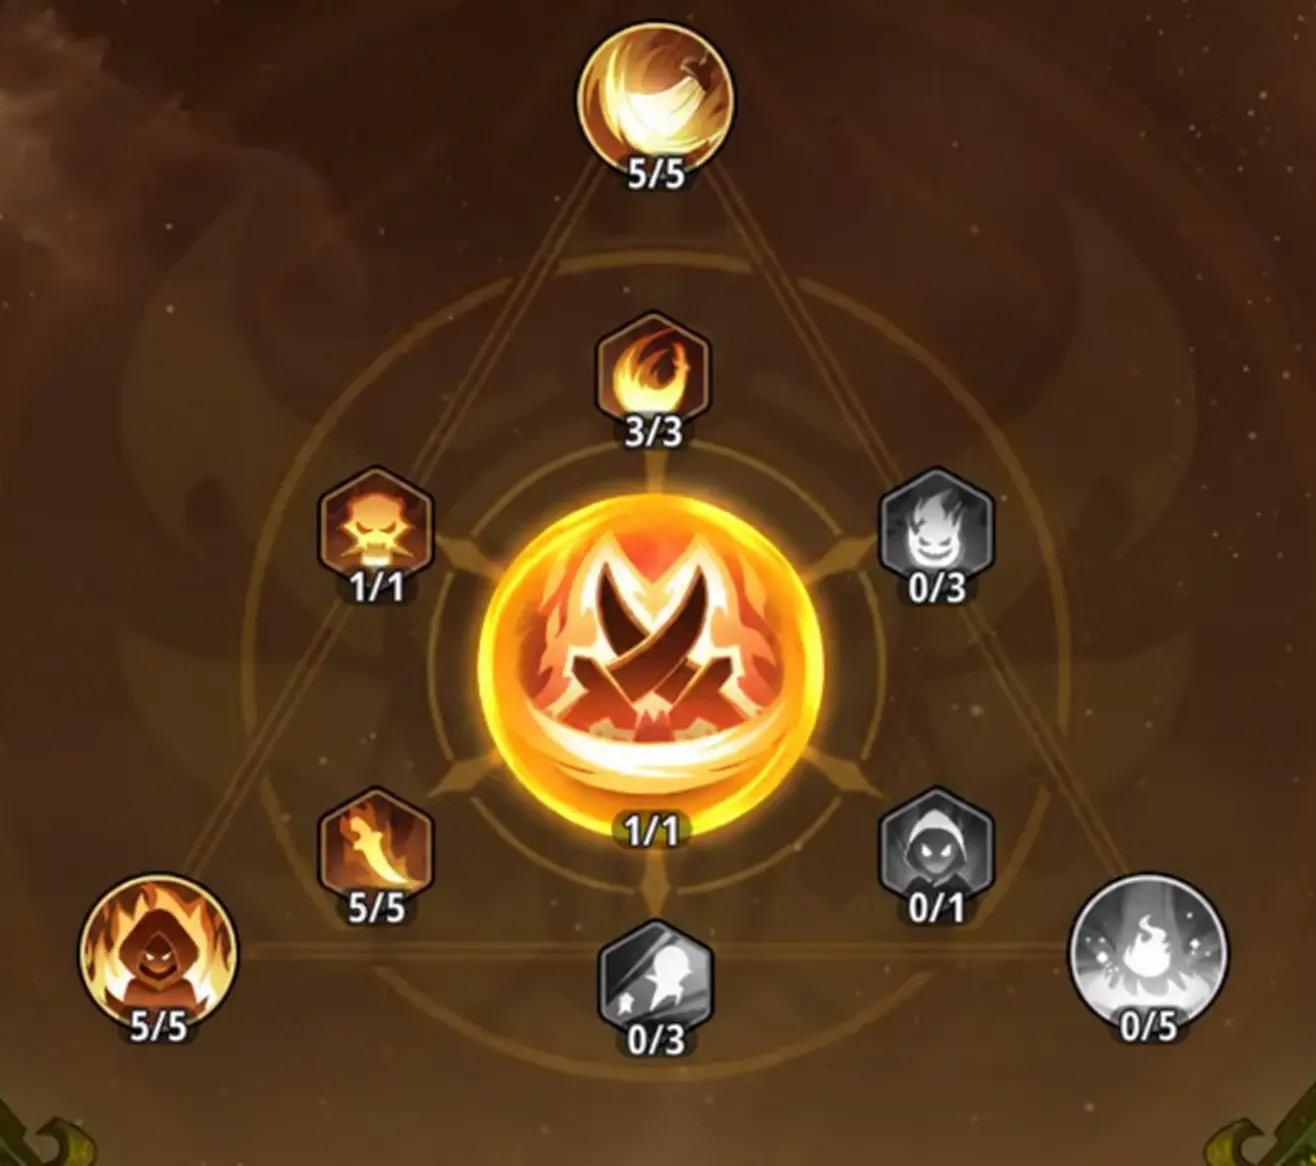
Assassin example · 20/20 captured
Assassination Specialization
This route turns Ambush into a controlled burst cycle: enter the state, strengthen and extend its damage increase, make the first hit explode around the target, then gain more damage by attacking from behind.
Points shown20 / 20 spentCurrent enhancementShadow Explosion · extra damage rate +1,000%Open alternativesDamage immunity, movement speed, high-HP scaling or delayed activation
English labels are faithful translations of the supplied Portuguese tooltips; all levels and values are unchanged.
Assassin node guide
Build the Ambush window
The point badge matches the supplied tree. The current route uses six nodes for 20 points; the four 0/x cards are alternatives, not active bonuses.
 Core
CoreAssassination Specialization
1/1If no Talent skill is cast for 1.5 seconds, enter Ambush and immediately gain a damage-increase effect. Skills cast during the next 5 seconds deal 25% extra damage. Ambush has a 15-second cooldown.
 First-hit burst
Shadow Explosion
5/5After entering Ambush, your first attack against an enemy deals extra damage to enemies within 10 metres of it. Damage rate: 700% / 1,400% / 2,100% / 2,800% / 3,500%.
 Burst scaling
Shadow Amplification
5/5Increases the damage-increase effect gained from Ambush by 5% / 10% / 15% / 20% / 25%.
 Extra trigger
Hidden Lethal Intent
1/1After remaining motionless for 14 seconds, also enter Ambush for 2 seconds. This shares a cooldown with the Ambush triggered by Assassination Specialization.
 Positioning
Back Ambush
5/5While a damage-increase effect is active, damaging a monster from behind applies an additional Laceration and increases your damage to it by 5% / 10% / 15% / 20% / 25% for 5 seconds.
 Duration
Master of Ambushes
3/3Increases the duration of the damage-increase effect gained from Ambush by 1 / 2 / 3 seconds.
 Defence
Phantasmagoric Presence
0/3When entering Ambush, there is a 50% / 100% / 100% chance to gain 1 / 1 / 2 Damage Immunities for 2 seconds.
 High-HP scaling
Mercy Strike
0/5While HP is above 50%, Back Ambush's Bleed damage increase rises by 4% / 8% / 12% / 16% / 20%, and Shadow Explosion damage rises by 20% / 40% / 60% / 80% / 100%.
 Mobility
Swift Shadow Step
0/3On entering Ambush, movement speed increases by 20% / 30% / 40% for 5 seconds.
 Window control
Seize the Opportunity
0/1The Ambush damage increase no longer activates immediately. It activates when you act.
Assassin route reading
The capture is built for one concentrated Ambush burst
These conclusions follow directly from the active node triggers. Reset is free, so compare the same encounter before replacing any part of the route.
Trigger, extend, explode
Assassination Specialization opens the window. Shadow Amplification and Master of Ambushes make it stronger and longer, while Shadow Explosion converts the first attack into a 3,500% area hit.
1.5s setupAmbush damageFirst-hit AoE
Reach the back before unloading
Back Ambush only pays off when the enemy is facing away from you during a damage-increase effect. It adds Laceration and up to 25% more damage for 5 seconds.
Rear positionLaceration5s target debuff
Trade damage for control or safety
Swift Shadow Step fixes movement, Phantasmagoric Presence protects the entry, Mercy Strike scales the two damage nodes above 50% HP, and Seize the Opportunity delays activation until you act.
MobilityImmunityWindow control
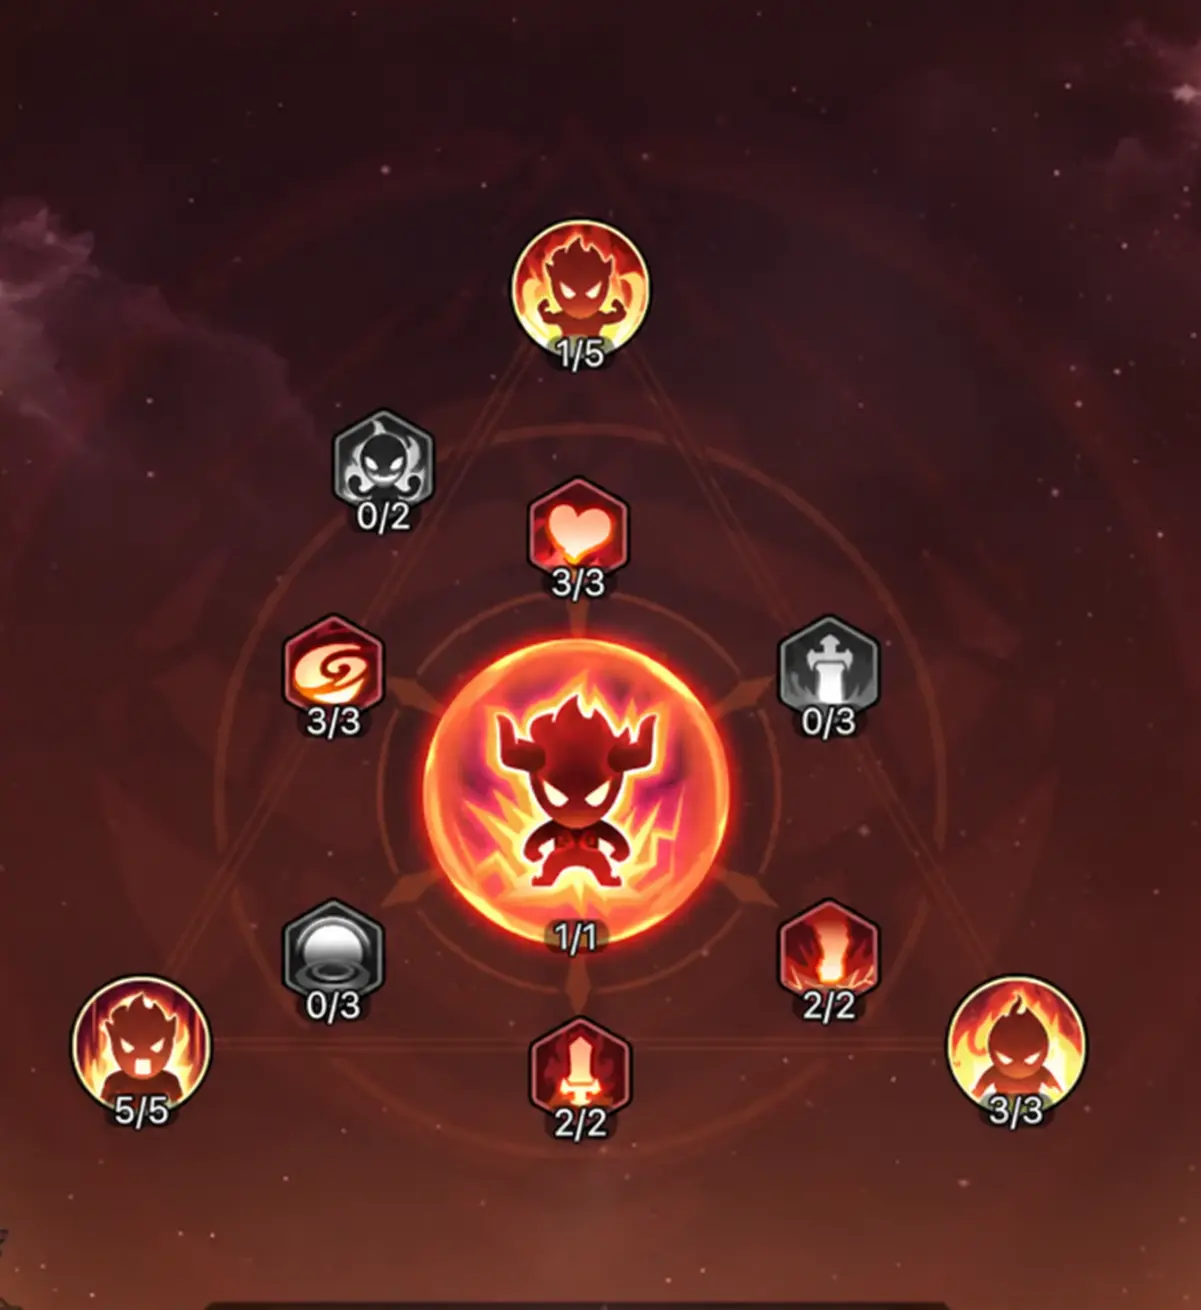
Fighter example · 20/20 captured
Endless Combat Will
This route builds a 300-point Rage gauge, enters Rage Burst, then stretches the window with more Rage generation, lower Tactical-skill consumption and extra defence. The selected Rage Enhancement – Enhanced effect reduces Rage consumption by 20 points.
Points shown20 / 20 spentCore shownEndless Combat Will · 1/1Current enhancementRage consumption −20 points
All eight active nodes were verified across the 1,095 frames in the supplied recording. The four grey 0/x alternatives remain unpublished because their tooltips were not opened.
Fighter node guide
Build and maintain the Rage Burst window
The point badges match the recording. These eight active nodes total 20 points; no names or effects have been invented for the four uncaptured grey alternatives.
 Core
CoreEndless Combat Will
1/1Recover 1 Rage for every instance of damage taken, up to 300 Rage. At maximum Rage, enter Rage Burst: body size increases and skill effective range rises by 50%. Rage then decreases by 20 per second; taking damage no longer grants Rage, and the state ends at 0.
 Tactical scaling
Rage Enhancement
1/5When using Tactical skills, consume 50 Rage to enhance the skill's effect by 5% / 8% / 12% / 16% / 20%.
 Core-skill gain
Rage Burst
5/5When using Core skills, there is a 15% / 20% / 25% / 30% / 40% chance to gain an additional 10 / 15 / 20 / 25 / 30 Rage.
 Passive gain
Oppressive Energy Charging
3/3While not in Rage Burst, gain 10 / 20 / 30 Rage every 5 seconds. If more than 5 enemies are nearby, gain an additional 10 / 20 / 30 Rage.
 On-hit gain
Furious Heart
3/3Gain an additional 0.5 / 1 / 2 Rage for every hit taken.
 Burst refill
Combat Intensity
2/2During Rage Burst, the chance to gain extra Rage from [Rage Outburst] activation is increased by 30% / 60%.
 Cost reduction
Unyielding Fury
2/2During Rage Burst, Rage consumption triggered by [Rage Enhancement] is reduced by 7 / 15.
 Defence
Blazing Flame Barrier
3/3During Rage Burst, gain an additional 5% / 10% / 15% damage reduction.
Fighter route reading
The route has three jobs: fill, spend and survive
Every recommendation below follows directly from the captured triggers. Test the same encounter after a free reset before changing the 20-point distribution.
Reach 300 Rage sooner
Oppressive Energy Charging adds Rage every 5 seconds, Furious Heart rewards incoming hits, and Rage Burst gives Core skills a chance to add up to 30 more Rage.
Passive gainOn-hit gainCore-skill gain
Spend without draining too quickly
Rage Enhancement strengthens Tactical skills, while Unyielding Fury lowers that consumption. Combat Intensity adds more chance to recover Rage through Rage Outburst.
Tactical boostLower costBurst refill
Use density without losing the window
More than five nearby enemies doubles Oppressive Energy Charging's gain outside Rage Burst. Once active, Blazing Flame Barrier adds up to 15% damage reduction.
Six-plus enemiesFaster build-up15% damage reduction

Priest example · 20/20 captured
Vital Link
This route grows one link into a four-unit support network. It adds immediate and periodic healing, strengthens healing on linked targets, extends the safe link distance and unlocks a four-link movement and damage bonus.
Points shown20 / 20 spentMaximum networkFour connected unitsCurrent enhancementLink Enhancement · healing effect +5% extra
All nine node tooltips, their rank values and the complete tree were read from the supplied in-game captures.
Priest node guide
Build and protect the four-unit link network
The point badges match the supplied tree. Seven active nodes total 20 points; Kinetic Dampener and Link Protection are visible alternatives with no points currently spent.
 Core
CoreVital Link
1/1After combat begins, every 10 seconds this attempts to link to the allied unit with the highest Max HP. Healing from your skills on that target increases by 6%. The link breaks if the target moves too far away; when it breaks, both units lose 20% Max HP. A player can be linked to only one Priest at a time, except in League Trials.
 Link heal
Energy Infusion
5/5When a link is established, immediately heal the target at a 50% / 75% / 100% / 125% / 150% healing rate, then apply an extra heal to that target every 5 seconds.
 Extra targets
Versatility
3/3If the existing linked target is still present when the next connection occurs, select one additional target to link, up to 1 / 2 / 3 extra targets.
 Link range
Powerful Link
3/3Increases the distance required to break a link by 20% / 35% / 50%.
 Healing scaling
Link Enhancement
5/5Healing effects on linked targets increase by an additional 2% / 4% / 6% / 8% / 10%.
 Damage sharing
Life Sharing
1/1When a linked unit takes damage greater than 20% of its Max HP, you have a 25% chance to take 50% of that damage for it. This can occur at most once every 10 seconds and cannot exceed 40% of your current HP.
 Four-link payoff
Resonance Amplification
2/5When four units are connected, your movement speed and every linked target's movement speed increase by 20%. Damage dealt increases by 1% / 2% / 3% / 4% / 5%.
 Shared-damage defence
Kinetic Dampener
0/5When Life Sharing activates, the shared damage you receive is reduced by 5% / 10% / 15% / 20% / 30%.
 Break protection
Link Protection
0/3Reduces the Max HP loss caused by breaking a link to 15% / 10% / 0%.
Priest route reading
The route has three jobs: connect, sustain and protect
The mechanics below come directly from the captured triggers. Compare the same encounter after a free reset before changing the 20-point distribution.
Grow the network without breaking it
Vital Link starts on the ally with the highest Max HP. Versatility expands the network to three extra targets, while Powerful Link raises the break distance by 50%.
Highest-HP anchorThree extra targets+50% break distance
Front-load recovery, then keep it ticking
Energy Infusion heals immediately at a 150% rate and again every 5 seconds. Link Enhancement adds 10% more healing, plus the captured Enhanced effect's extra 5%.
150% opening heal5-second cycleLinked healing
Share pressure and move together
Life Sharing can absorb half of a qualifying hit. With four connections, Resonance Amplification gives the whole network 20% movement speed and currently adds 2% damage.
Damage sharing+20% movementCurrent +2% damage
Next chapter · Magic Stones
Learn the rules first. Then see the five stones in Rishi's Mage.
Magic Stones remain part of Specialization, but their recipes, attributes and resonance need enough room to explain properly.
GENERAL GUIDE
How Magic Stones work
Six shapes, stat families, completed thresholds, Mage recipes, crafting and resonance costs.
Open the stone guide RISHI'S MAGEWhy this five-stone set is equipped
See the exact Round Shield ×2 + Prism + Star + Moon recipe and what every equipped stone contributes.
Open Rishi's stones